Tuesday, February 9, 2016

How to build a MiniPwner with a TP-LINK TL-MR3040

A MiniPwner is a penetration testing drop box which can provide some interesting capabilities if you're able to insert one into a target's network. It is a small device and with the MR3040 in particular, it contains a battery which means you don't have to worry about power for at least a few hours. Because it runs OpenWRT there are a variety of infosec friendly packages which can facilitate things such as reverse SSH or VPN tunneling, port scanning with nmap, and while it may not have the horsepower to run Metasploit you can certainly use a MiniPwner as a conduit to forward traffic from a Metasploit install elsewhere. The tutorial that follows is more or less what is described on their website, but some steps are glossed over which I cover here so hopefully this helps fill in the gaps for people that may not be comfortable fiddling with embedded devices.

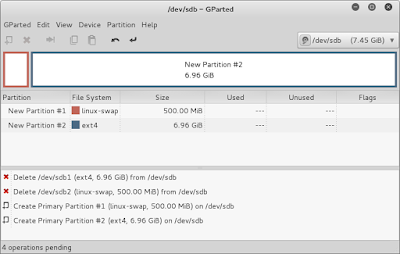
First take a USB drive (the tutorial suggests a 16gb USB stick, but I'm using 8gb in this tutorial) and format it such that the first partition is a 500mb swap and the remaining partition is ext4. I did this in Kali and the utility gparted. Here is a screenshot of what gparted looked like.

Next, download the OpenWRT firmware that is appropriate for the MR-3040 here.

Using the ethernet cable plug the MR3040 into a computer. Authenticate to the router by navigating to 192.168.0.1 and use admin/admin as the credentials.

Navigate to the Firmware Upgrade endpoint by clicking on System Tools on the left hand side to expand those options. Then click on Firmware Upgrade.
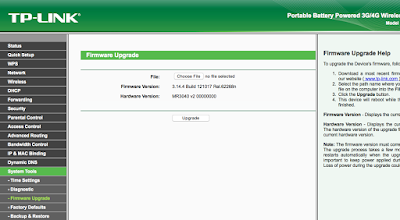
Click on the Choose File button and select the openwrt-ar71xx-generic-tl-mr3040-v2-squashfs-factory.bin file you downloaded earlier.

Click Upgrade. A confirmation dialog will appear and the MR3040 will proceed to be flashed with OpenWRT.


After the flashing process finishes, the MR3040 will reboot. After flashing the MR3040, the default IP address gets updated to 192.168.1.1 instead of 192.168.0.1. Access the newly flashed MR3040 by pointing your browser to 192.168.1.1. You may have to disconnect your host computer from your home Internet connection while this happens since 192.168.1.0/24 is a common network for home routers.

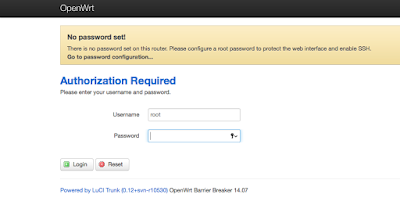
After pointing your browser to 192.168.1.1 you can authenticate to the MR3040 with a username of root and a blank password.


The next task will be to install packages the will enable the MR3040 to interface with the USB drive. In order to do that we will need to get Internet access for the MR3040. In this case, I used the MR3040 to connect to my home wifi network. To do this I clicked on Network and then Wifi. Then I clicked on Scan to have the MR3040 identify my home wifi network.


After the scan identified my home wifi network, I clicked on Join Network. The next screen asks for the passphrase, allows you to set a network name, and configure firewall rules. I left the network name as the default wwan, and the firewall rules to wan which was empty for me. Another screen comes after this which confirms all of the details and I clicked on Save & Apply.

Next, open a terminal and telnet into the MR3040. You should not have to supply credentials at this point.
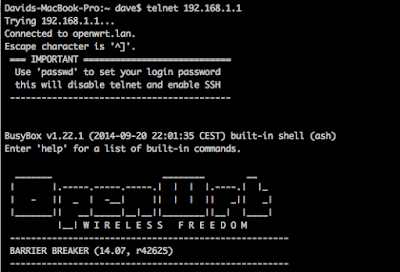

Confirm that you have Internet access by pinging 8.8.8.8. DNS is not working properly at this point though, so we'll need to update the network configuration for the br-lan interface. Configure the /etc/config/network file and add the line, option dns '8.8.8.8' to the entry for the lan interface. It should look like this:
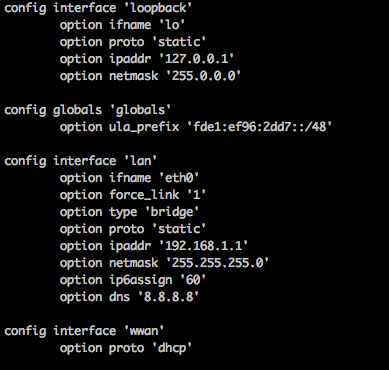

Reboot the MR3040 by typing reboot -f and when it comes back up telnet back in and attempt to ping a domain name. It should work this time. Now we should be able to update the MR3040 appropriately. From your telnet session, type opkg update to update the list of packages that can be installed. Now we'll install all of the packages for USB by typing: opkg install kmod-scsi-core kmod-usb-storage block-mount kmod-lib-crc16 kmod-crypto-hash kmod-fs-ext4
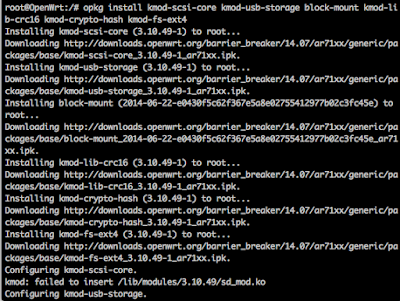

Insert the USB stick in to the 3G port and reboot by typing, reboot -f from the telnet session. Telnet back into the MR3040. Our next task is to get the MR3040 to recognize the USB drive. We'll do this by modifying the /etc/config/fstab file. First make a backup of the file and then proceed to edit fstab until it resembles this:
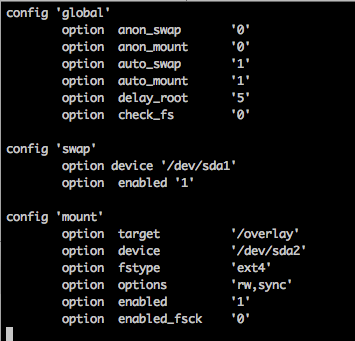

Then copy the contents of the flash memory on the MR3040 onto the USB drive with the following commands:
mkdir -p /tmp/cproot
mount --bind / /tmp/cproot
mkdir /mnt/sda2
mount /dev/sda2 /mnt/sda2/
tar -C /tmp/cproot -cvf - . | tar -C /mnt/sda2 -xf -
umount /tmp/cproot

Then update /etc/config/fstab so that the MR3040 will use the USB drive as the root folder. Update /etc/config/fstab so it resembles this:


Reboot the MR3040 by typing reboot -f again. Now we will verify that the MR3040 is identifying the USB drive correctly by typing, df -h, to look at the disk space usage. You should see that /dev/sda2 is there and has gigabytes of space available.


Now we will install the MiniPwner overlay. Change directory into /tmp and download the overlay with this command, wget http://minipwner.com/images/Overlay/minipwner-overlay_2.0.0.tar.
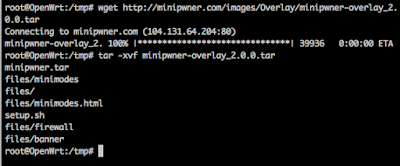

Extract it with this command, tar -xvf minipwner-overlay_2.0.0.tar. It appears that the setup.sh that got archived in this tar was edited using Windows style line endings. Edit the setup.sh file and manually delete the dos line ending ^M characters at the end of each line. I attempted to set the file format to be unix, using :set ff=unix, but was unsuccessful. Save setup.sh and execute it with, sh setup.sh. Flip the 3-way switch to be WISP and reboot.

Telnet back in and you should be welcomed with a MiniPwner banner instead.
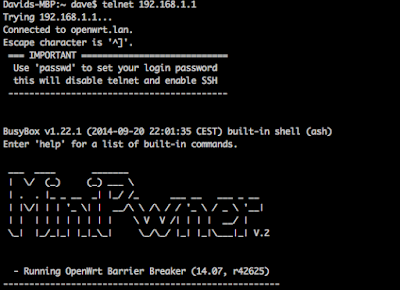

Now we will go through the process of installing security related packages. Type, opkg update, to update the list of packages the MR3040 is aware of. Next install the packages with the following commands (I ran into a character limit on the terminal so I had to split it up into two commands):
opkg install libpcap libstdcpp libpthread zlib libopenssl libbz2 bzip2 terminfo libnet1 libpcre libltdl libncurses librt libruby wireless-tools hostapd-common-old kmod-madwifi ruby uclibcxx libnl libcap libreadline libdnet libdaq libuuid libffi python-mini openssl-util kmod-tun liblzo libevent2-core libevent2-extra libevent2-openssl libevent2-pthreads libevent2 aircrack-ng elinks ettercap karma kismet-client kismet-drone kismet-server netcat nmap openvpn-easy-rsa openvpn-openssl perl samba36-client

opkg install samba36-server snort tar tcpdump tmux yafc wget python vim unzip

If you want to install any other packages at a later date, be sure to run, opkg update, before attempting to opkg install your desired package.

Finally, don't forget to run the passwd command to set a password, disable telnet, and enable SSH. The next time you try to remote into your device you will have to use SSH to access it.

Monday, May 18, 2015

GPU Based Password Cracking with Amazon EC2 and oclHashcat

Password cracking is an activity that comes up from time to time in the course of various competitions. While it would be nice to have a dedicated password cracking rig, like anything from Sagitta HPC, it's just not practical for many people myself included. Having access to a GPU cracking machine would be nice from time to time however and the GPU systems that Amazon EC2 supports offers a decent compromise. Doing research on how to setup a password cracking program such as oclHashcat on EC2 came up with results that gave all sorts of conflicting directions. These instructions seem way more straight forward then anything I've come across so hopefully this will be useful for you too. 

First things first. Let's establish a baseline to determine how much better using EC2 will be versus what I typically use during CTFs, a Kali Linux VM. Using hashcat and running it in benchmark mode here are the stats it produces:
Nothing special obviously. Let's see how much of a jump we can get by spinning up a GPU enabled instance on Amazon EC2. I'll assume you've at least gone through the effort of creating an Amazon AWS account. If not, go here first and register yourself. 

First thing is to launch a new instance. From your EC2 dashboard click on the Launch Instance button. 


This will take you to a list of available Amazon Machine Images (AMI). The one we will be using is called the Amazon Linux GRID AMI. Click on the AWS Marketplace tab on the left hand side and search for "Amazon Linux GRID AMI". 

Click the Select button to choose this AMI.

The next screen shows you the available types of EC2 instances that the AMI can run on. Since we're interested in an EC2 instance that supports the NVIDIA GRID GPU driver, the only ones that are available to us are the g2.2xlarge (which has 1 video card) and the g2.8xlarge (which has 4 video cards). For now we will choose the the g2.2xlarge instance. All of the steps in this post work for the g2.8xlarge instance as well. The only difference being that you select g2.8xlarge at this step.

Click the g2.2xlarge row and click on the "Review and Launch " button. You'll be asked if you want to use an SSD or magnetic as the boot volume. I think the SSD boot volume may incur additional costs so I opted to use the magnetic boot volume.
You can click on the "Next: Configure Instance Details" button if you need to configure additional options such as subnets or other specific behaviors. You can also adjust the amount of storage the AMI will have. The default is 8gb which won't hold most decent sized wordlists so you may want to bump that up if you'd like. This won't be necessary for this tutorial though.

The next screen will allow you to review the details of the instance you are about to launch. Nothing special here and you can proceed to click the "Launch" button.

At this point you'll then be asked which key pair you want to use to connect to this instance. Amazon will force you to use a private key file to authenticate to instances. If you already have a PEM key pair you can select that option. I'll assume you have never done this before so I'll go through creating a new key pair. Select "Create a new key pair" from the top drop down box and enter a name for the new key pair you are about to create and click the "Download Key Pair" button. I named mine nova-test-oclhashcat. Keep this file somewhere safe. If you lose it you cannot re-download the file. This means you will never be able to authenticate to the instance again.


Once you have the PEM file downloaded you can click the "Launch Instances" button. Amazon will start the process of spinning up the instance. You will be taken to another site that has a link to your specific instance. In my case, my instance was named i-55b95da9. Click on the link that corresponds to your instance.


Clicking on that link will take you to a status site for your instance. This will give you the information necessary to authenticate to your instance. Take note of the public IP. You will need that piece of information.


The next steps on how to connect to the instance will be from OS X. It should be the same from Linux. However, if you're using Windows and Putty, you'll need to follow a different set of instructions to connect. You can read more about that here.

Open a terminal and navigate to the directory where you downloaded your PEM file. If you do a ls -l on the file you'll see something like this: 


If you go ahead and try to connect using that file, you'll be rejected because the permissions are too lax on it. It has to be a read only file. To fix that we'll need to chmod the file so it's readable only by the user.


Now we can authenticate to the instance via SSH.


Next we will go about installing the latest NVIDIA drivers on our instance by basically following this guide.
First we will uninstall the current NVIDIA driver by typing:
[ec2-user@ip-172-31-9-193 ~]$ sudo yum erase nvidia cuda -y

Next we will download the latest NVIDIA driver. Go here and select these options from the drop down boxes and press the "Select" button:

  • Product Type: GRID
  • Product Series: GRID Series
  • Product: K520
  • Operating System: Linux 64-bit
  • Language: English (US)
  • Recommended/Beta: Recommended/Certified
It should look like this:

Select the newest driver, in my case its version 346.72. Click through the next screen and when you get through to the download page, right click and copy the link the "Agree and Download" button links to.
Go back to your SSH session and download the driver to the instance:
[ec2-user@ip-172-31-9-193 ~]$ wget http://us.download.nvidia.com/XFree86/Linux-x86_64/346.72/NVIDIA-Linux-x86_64-346.72.run

Next we will update all of the packages on our instance
[ec2-user@ip-172-31-9-193 ~]$ sudo yum update -y

Then we will reboot our instance so we load the latest kernel version if it happened to be updated. 
[ec2-user@ip-172-31-9-193 ~]$ sudo reboot

Give the instance a few moments to reboot and reconnect. After connecting install the Development Tools package group.
Davids-MBP:~ dave$ ssh -i nova-test-oclhashcat.pem.txt ec2-user@52.7.150.101
[ec2-user@ip-172-31-9-193 ~]$ sudo yum groupinstall -y "Development tools"

Then we will install additional files.
[ec2-user@ip-172-31-9-193 ~]$ sudo yum install kernel-devel-`uname -r`

Now we will install the NVIDIA drivers you downloaded earlier. My command will be different from yours if the driver you downloaded is of a different version.
[ec2-user@ip-172-31-9-193 ~]$ sudo /bin/bash NVIDIA-Linux-x86_64-346.72.run

The install process for the NVIDIA driver will ask you a few configuration questions. Here are configurations I performed:
  • Accepted the license
  • Yes to registering the kernel module sources with DKMS
  • Yes to installing the 32-bit compatibility libraries
  • OK to the disclaimer about the libvdpau and libvdpau_trace libraries
  • Yes to running the nvidia-config utility
  • OK to acknowledge the X config file was updated
Then we will once again reboot the instance. 
[ec2-user@ip-172-31-9-193 ~]$ sudo reboot


Give the instance a few moments to reboot and reconnect. After connecting we will verify that the driver if functional:
Now that we have an update to date NVIDIA driver we will install oclHashcat. First we will go here and copy the download link to the latest NVIDIA version of oclHashcat. At the time of this writing it was v1.36. Download this file to your instance.
[ec2-user@ip-172-31-9-193 ~]$ wget http://hashcat.net/files/cudaHashcat-1.36.7z

In order to extract this file we need to install p7zip. In order to do that we need to run a few commands to install it.
[ec2-user@ip-172-31-9-193 ~]$ sudo yum-config-manager --enable epel
[ec2-user@ip-172-31-9-193 ~]$ sudo yum install -y p7zip

Now we can extract oclHashcat.
[ec2-user@ip-172-31-9-193 ~]$ 7za x cudaHashcat-1.36.7z

Change directory into where you extracted cudaHashcat-1.36 to and you now have access to oclHashcat:
Let's run some benchmarks to see what the performance is like on this machine:
[ec2-user@ip-172-31-9-193 cudaHashcat-1.36]$ ./cudaHashcat64.bin -b


As we can see on a few of these figures the Amazon instance blows away what I can do on my modest VM. My VM can hash194 words a second of sha512crypt while the Amazon EC2 instance can do 13,457 hashes a second. Similarly my VM can MD5 hash 6.06 million words a second but the EC2 instance can hash 2,492.9 million words a second. Definitely a big jump in performance. If you step up to the 4 GPU EC2 instance the performance scales linearly so you get 4x whatever numbers you see for the 1 GPU instance. 

Don't forget to stop your instance after you're done with it. Go back to the browser tab that has the status of the instance and click on the "Actions" button and select "Instance State" and then "Stop".


Thursday, September 11, 2014

Hardware Hacking: I2C Injection with the Bus Pirate

Hardware Hacking

Embedded hardware hacking seems to be all the rage these days so I thought I would poke around at a few concepts and see what's doing with embedded hardware. I decided to set up a simple experiment to test some concepts that I think will be helpful to understand in the future when analyzing embedded systems, namely sniffing traffic and message injection.


The Experiment

I decided to create a simple lab involving an Arduino Uno, in this case a SparkFun RedBoard, and a BlinkM LED that can be controlled over I2C. The Arduino would have a simple sketch that will update the color of the BlinkM and using a Bus Pirate I would then sniff traffic that is occurring between the BlinkM and the Arduino. I would also like to study the process involved in using the Bus Pirate to inject messages to take control of the BlinkM and have it change to a different color. I'm not blowing anyone's skirt up with this, but I gotta start out somewhere.

I2C

The protocol used in this experiment is I2C. It is a simple two wire interface (TWI) that supports multiple masters and multiple slaves all sharing a serial bus. Aside from a power and ground I2C uses two lines to perform data transfer. The first is the Serial Data Line (SDA) and the second is the Serial Clock Line (SCL). Grossly, to the point of being misleading, simplified, each bit of data is transferred by reading if SDA is pulled high or low when SCL rises. Helpful resources to lean more about I2C can be found here and here. The main points to take away with respect to how components communicate with each other however is that each component has a read address and a write address. Before one component can talk to another, it will write the destination address (be it a read or write address) on the SDA line and then the rest of the data.

Assembling The Circuit

Creating the circuit was a fairly simple exercise. It's not difficult, it just requires some upfront investment in purchasing hardware. It's a far cry from just spinning up a new VM if software hacking is what you're used to. 

First, I plugged in the BlinkM into a breadboard.

I then connected Male to Male (M-M) jumper cables from the ground pin (PWR -) to the GND pin on the RedBoard, the power pin (PWR +) to the 5V header on the RedBoard, the data pin (I2C d) to the A4 header on the RedBoard, and the clock pin (I2C c) to the A5 header on the RedBoard.


With the circuit connected we can now focus on programming controlling the BlinkM with the RedBoard.

Programming the Circuit

Once you give power to the Arduino, you'll probably see the BlinkM light up right away. And if you're like me you'll immediately try to program it and see that it has no effect on the BlinkM and wonder why it's not working. Well, the BlinkM comes out of the box pre-programmed to run a demo script. In order to cease running the script you'll have to send it the Stop Script command documented in the manual for the BlinkM. The easiest way to do that is to load some example code that the makers of the BlinkM provide found here. The BlinkMTester sketch will give you the ability to run some basic commands to control the BlinkM and stopping the script is one option.

With that out of the way we can now program the BlinkM. For my little example I wanted to have the BlinkM change from red to green back and forth at 3 second intervals. 


With the sketch uploaded we can see the Arduino and BlinkM go into action.

The Bus Pirate

Now that we have a functioning circuit that can serve as a test bed, we can use the Bus Pirate to sniff traffic on it. The Bus Pirate is a neat little tool that can serve many different functions. It can sniff traffic over a variety of protocols such as UART, SPI, and I2C and it can also inject traffic as well. 

In order to have the Bus Pirate be able to sniff traffic on our little circuit we need to insert a couple more Male to Male wires on the SDA and SCL lines. We will then connect the MOSI Bus Pirate probe to the BlinkM's SDA line and the CLK Bus Pirate probe to the BlinkM's SCL line. Be wary of where you purchased your Bus Pirate probes because the colors will be completely off if you bought it from SeeedStudio/Adafruit vs Sparkfun. 


Sniffing I2C Traffic

Now, once you've connected to your Bus Pirate using Putty or some other serial terminal you can start sniffing the traffic being passed from the RedBoard to the BlinkM. To do this we will change the Mode of the Bus Pirate so that it is in I2C mode and then drop the Bus Pirate into sniffing mode.

From the screenshot we can see the I2C messages being sent. Each message starts with a [ character and then shows the hexadecimal value of each byte being sent, followed by a + for an ACK or a - for a NACK and is then followed by the end of the message which is the ] character. In this instance the first message sniffed corresponds to the portion of the sketch which is commanding the BlinkM to turn red. 0x12 is the write address of the BlinkM (I know we set the address to be 0x09 in the sketch, but that translates to a 0x12 write address) followed by the hexadecimal ASCII value for the h character (0x68) then followed by the 3 bytes for the hue (0x00), saturation (0x10), and brightness (0x01). Then it's followed by another message that changes the color to blue and then back to red over and over.

This let's us know that we are reading the right messages and validates the data that we think we are sending with the RedBoard. Now for the more interesting part, how to take control of the BlinkM with the Bus Pirate.

Injecting I2C Traffic

Controlling the BlinkM with the Bus Pirate will require us to mimic the message structure but using Bus Pirate syntax. In this case we need to write to the address 0x12 and send the following bytes:
  1. 0x68 - This is the h character which tells the BlinkM to fade to another color using the next 3 bytes as the HSB values
  2. 0xAA - This is the color blue
  3. 0x10 - This is the saturation value
  4. 0x01 - This is the brightness value
To send a message with this kind of structure we will type into the I2C prompt of the Bus Pirate this command:


Once you inject the command the feedback from the Bus Pirate should indicate that it received ACKs for each byte you injected.

If all goes well you should see the BlinkM turn blue when you inject the message; something that should never occur if the RedBoard is the only master on the I2C bus. Note that the color won't stay blue forever as the RedBoard will continue to send messages to change the color of the BlinkM red and green.

Success! Exciting right? Hello? <tap> <tap> Is this thing on? <tap> <tap> 

Tuesday, March 4, 2014

Tamper With Parameters In Iambic Pentameter: Hacking GoatDroid With Burp Suite in MobiSec

Today we will be looking at tampering with parameters using a proxy. This is a fairly common thing to do in web application assessments and most mobile application testing is an extension of that so we'll examine how to proxy DroidGoat's traffic through Burp.

Updating Burp Suite in MobiSec

MobiSec, unfortunately, does not come with the most up-to-date version of Burp Suite, 1.4. Currently 1.5 is offered so we'll just update to that. First we go to http://portswigger.net/ and download it to /opt/mobisec/pentest/burp and then we will edit the script that launches Burp which is located in /opt/mobisec/burp.sh and update the call to the jar. 

Sure, we could just run the updated Burp Suite jar manually, but now when we run Burp Suite from the menu it'll run our updated version.

Proxy Our Android Traffic

Next, we'll configure our Android Virtual Device (AVD) so that it'll pass traffic through Burp Suite. GoatDroid gives up the ability to configure a proxy through the application itself, but we'll do it this way because it's a more generic approach that will allow us to proxy traffic when we're testing any other application. We'll crack open the script that is responsible for launching AVDs through the menu just to see how they do it, /opt/mobisec/android-emu.sh, and we'll add the necessary argument, -http-proxy, to proxy traffic and then save it to another script, say android-emu-burp.sh.

Burp Suite's proxy runs on port 8080 by default. If you change the port it runs on, then don't forget to update your script too!

Tying It All Together

Now, we'll run Burp Suite, run GoatDroid, then our AVD, and start looking at the traffic passed through. Poking around the FourGoats application, using goatdroid/goatdroid as our credentials we see that there is a section titled Rewards. Note:  If Burp Suite is set to intercept traffic, it you will have to forward each and every request your app makes. You can go ahead and disable it for now by going to the Proxy tab and then the Intercept sub-tab and clicking the Intercept button so it reads, Intercept is off.

Within Rewards there is a tab to view My Rewards, which we don't have any...yet, and another tab to view Available Rewards. In order to unlock these achievements we'll have to checkin with the specified lat/long the requisite number of times. 

So, let's see what traffic is involved with performing a check in. Go back to the initial screen and drill into the Checkins screen. You get an indication that your device does not have a GPS location and this might be an issue. If you go ahead and click on the Check In Now button you'll be greeted with an error message. Well bugger...

Fortunately there are two ways around this. Your machine that is running the AVD will have port 5554 open on localhost. From there you can set your coordinates with this command, geo fix <long> <lat>:

Great! This should give us the lat/long so we can forge one checkin for the Steak Master Bonus! Let's go back to the Checkin screen...

Rawr! There appears to be some precision errors doing it this way. Well, there is another method of setting the lat/long on the device and that is to use the Android Debug Monitor (ADM). ADM is a useful utility, that you can launch from MobiSec by running the monitor command. ADM will then launch and give you a great deal of insight on your AVD. Things such as the filesystem, network usage, CPU usage, memory allocations, etc are exposed. We will use ADM more in future posts. In the Emulator tab, you can also set the lat/long as well. Let's attempt to set it to the coordinates that match the One Free NY Mets Ticket achievement and hit send.

Unfortunately we run into the same kinds of precision errors so this is out as well.

Parameter Tampering

In lieu of setting the coordinates through the device, another option we have is to trap the network traffic the app is having with the web service and tamper with the parameters to fool the service. If Burp Suite is not set to intercept traffic, go ahead and enable it by going to the Proxy tab and then the Intercept sub-tab and ensure that Intercept is On. Let's go ahead and click on the Check In Now button to see what we have. 

Here, we see that by clicking on the Check In Now button, we send a POST request to /fourgoats/api/v1/checkin, along with the parameters latitude=40.7548083333333334&longitude=-73.84512. This should be fairly straightforward now. We can either modify the parameters in the Raw tab or switch over to the Params tab and do it there. It can be cleaner to do it in the Params tab so we'll do that in this instance. 

Now, we have our POST request with our tampered parameters. It's good to go so we'll send it on it's way and click on Forward to send it to the web service. Going back to the app we see our first sign of success.

The tampered POST request was accepted and FourGoats thinks we checked into the Peter Luger Steakhouse. Now, we just have to do this 11 more times to unlock the reward. Normally, you'd repeat the last few steps 11 more times, but Burp Suite can speed this portion up considerably. Click on the History sub-tab of the Proxy tab and identify the POST request that was responsible for sending the forged lat/long. 

If you look at the Modified column, Burp Suite helpfully identifies items that you tampered with. This may help highlight the POST of interest. Right click on that item and select Send to Repeater.

Repeater is another tab in Burp Suite that will allow you to quickly and easily repeat POSTs or GETs. Click on the Repeater tab at the top and you should see the POST call you selected in the History sub-tab. 

If you wanted to change any parameters, you could do that here similar to how you did it in the Proxy tab, but that's not necessary this time so we can just hit the Go button 11 more times. Let's go see our rewards to see if our trick worked. 

Success! Let's go back to Repeater and punch in the other lat/longs and repeat the POST enough times to fulfill the other rewards. 

Awesome! Now where do I go to collect my cash and prizes? =P